OTC Clear Procedures Support
Overview of content
Portfolio Transfer
A portfolio transfer means, that two or more trades can be transferred as a portfolio.
The transfer can be a transfer to a different Clearing Member (ID) (Trade Transfer) or to a different account within the same Clearing Member (ID) (Account Transfer). A portfolio transfer always terminates the existing trades and re-opens a new trade with the same attributes and a new trade id.
FAQ
- Via Eurex OTC Clear GUI (Production / Simulation).
- It is exactly the same process for both environments (EurexOTC Clear GUI).
- A Clearing Member or Disclosed Client with clearing system access.
- For each transfer, a Clearing Member needs two users with respective access rights for the OTC Clear GUI to initiate and confirm the action.
- A detailed description of the process can be found in chapter 8 of the OTC Clear GUI User Guide (please see question 12. for the location of the guide).
- Clearing Member or Disclosed Clients with system access can trigger the transfer.
- The trades that should be transferred as a portfolio need to be selected.
- This can be done on two different ways, via the “Cleared Trades” tab or via the “File Upload” tab (Please take a look at Question 3.1 to 3.3).
- Who needs to approve it?
- By 4EP a second approval from another user is always necessary.
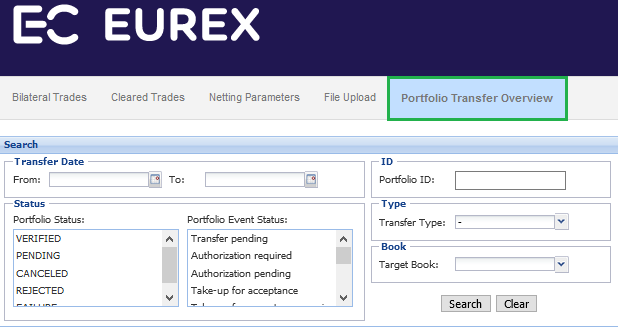
- A second user can now lookup the state of the portfolio transfer in the tab “Portfolio Transfer Overview”.
- Entering the Portfolio ID from the last step (and click on search) will provide this portfolio transfer only.
- Without entering the Portfolio ID and just clicking on search will additionally display all historical and all other pending portfolio transfers.
(EurexOTC Clear GUI)
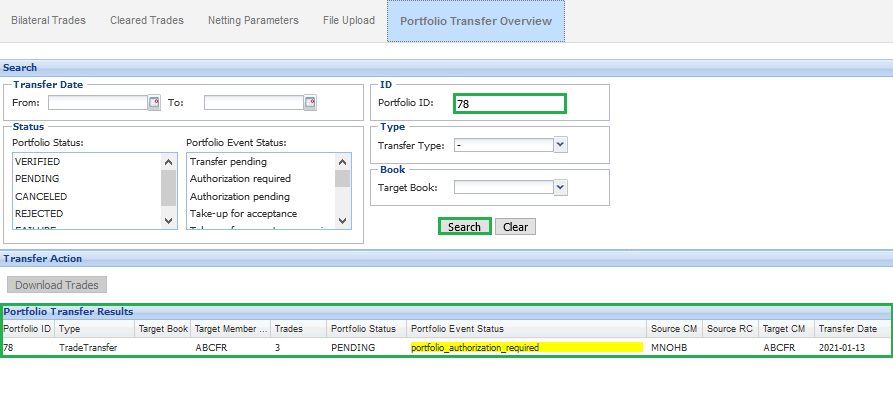
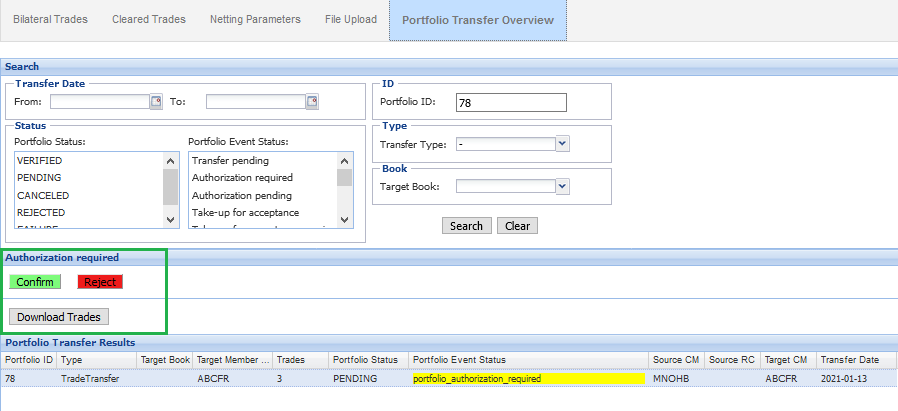
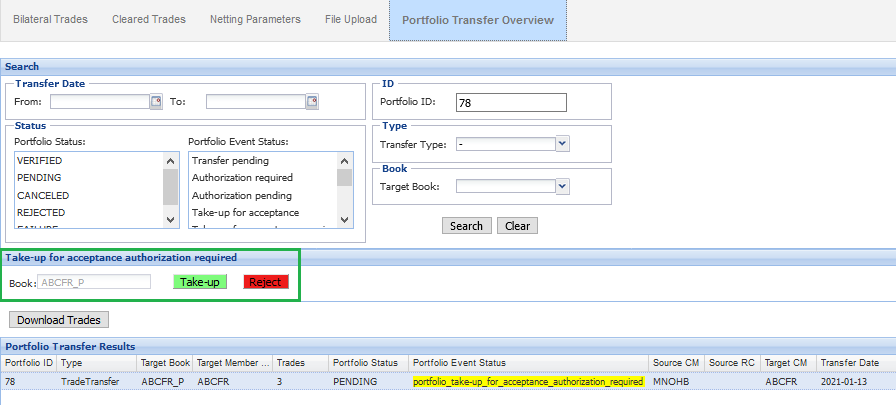
- By clicking on the portfolio event status the second user can then see the required authorization and can additionally download the portfolio to be transferred.
In case of a transfer to another Clearing Member (ID) (selection in prior step: trade transfer) the new Clearing Member (ID) will additionally need to perform the take-up of the portfolio:
1st user (new Clearing Member (ID)):
- The first user can specify the account to which the portfolio should be transferred.
- IMPORTANT: If no book is entered in the “Take-up for acceptance” window, the portfolio will be taken up in the account that is specified under “Target Book” in the “Portfolio Transfer Results” window and cannot be changed at a later step! Always double-check the account listed there.
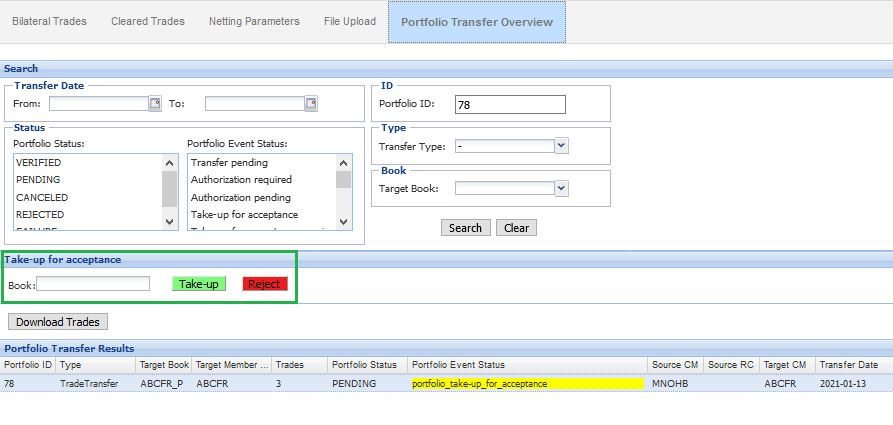
2nd user (new Clearing Member (ID)):
- The second approver cannot make any changes, just view the portfolio (via “Download Trades”) and accept or reject the transfer.
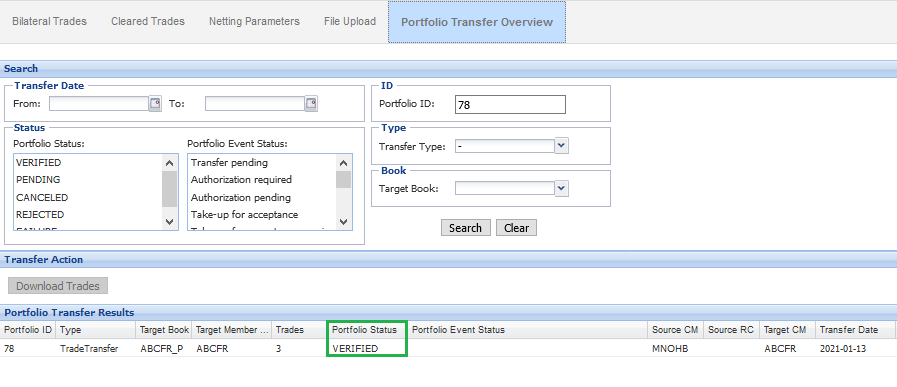
- After a successful take-up (in case of an account portfolio transfer the take-up was skipped) the following message will appear when searching for the portfolio id:
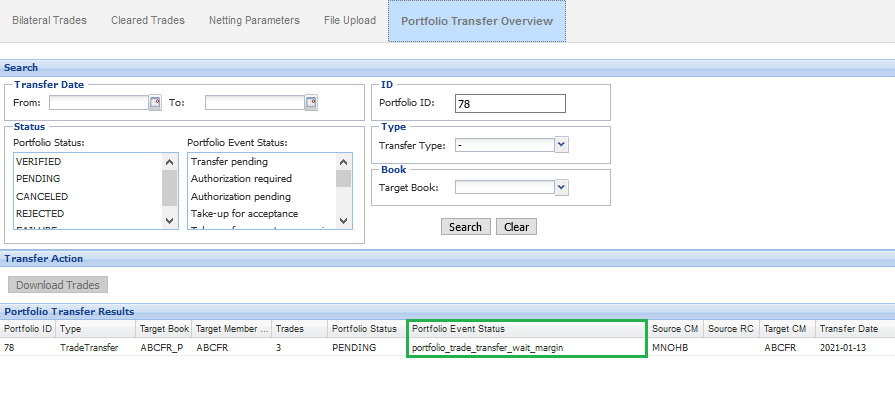
- Three times a day (1pm, 4pm and 8pm CET) a risk check (on portfolio level) is performed.
- If this incremental risk check is successful, then the portfolio transfer will be processed and the portfolio event status will change to “VERIFIED”.
- If the collateral is insufficient at the time of the incremental risk check during the 1st portfolio transfer batch at 13:00 CET/CEST, the respective transfer request(s) will not be processed in the 1st batch and will be reconsidered during the 2nd batch at 16:00 CET/CEST and thereafter in the 3rd batch at 20:00 CET/CEST.
- If the incremental risk check for a specific transfer request fails in all three batches, the corresponding portfolio transfer will be cancelled during the end-of-day processing.
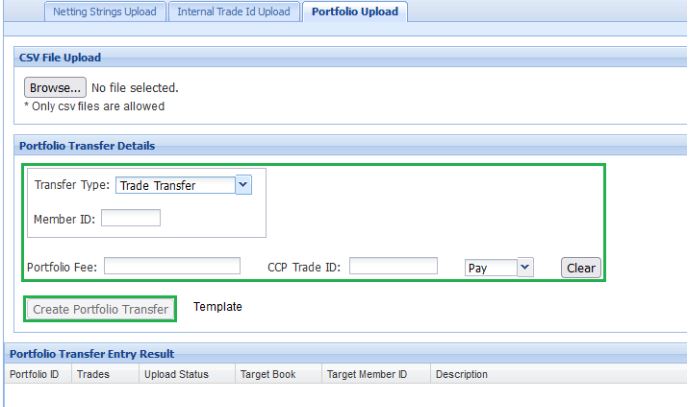
- In the EurexOTC Clear GUI you can find a template in the “File Upload” tab under “Portfolio Upload”.
(EurexOTC Clear GUI)
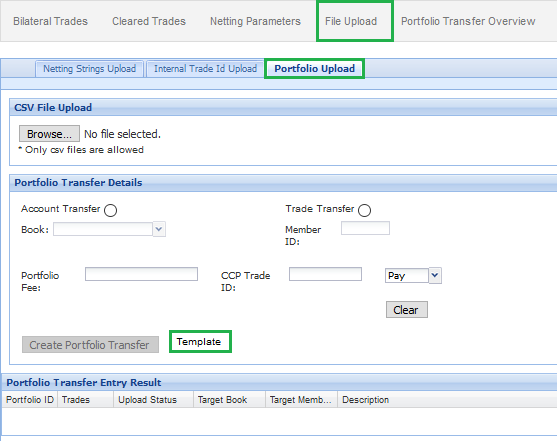
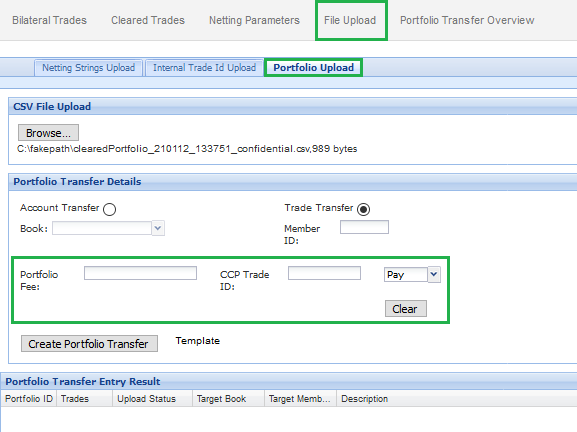
- The trade ids of the trades for the transfer as well as a fee (if desired) can be entered.
- The fee can either be entered in the template or in the GUI but not in both (will lead to an error message, more information on the fee in question 11.).
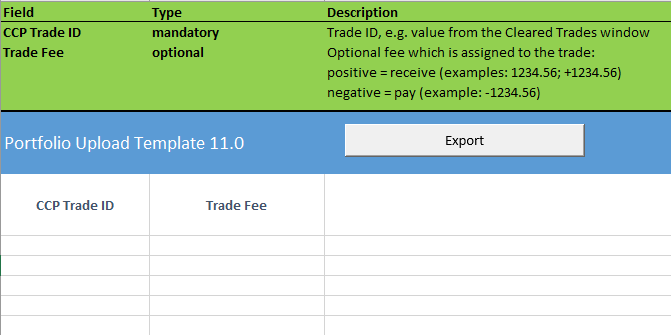
- Make sure to save the Excel file before clicking on “Export”.
- By this, another file will be created and stored at the same location where you stored the template (without saving the file no new file will be created).
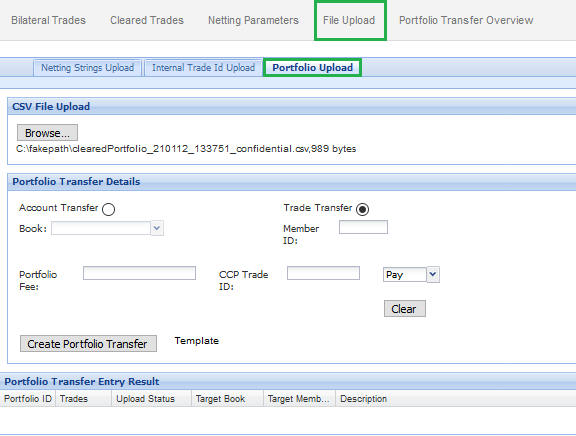
- In the EurexOTC Clear GUI, go to the tab File Upload > Portfolio Upload > Browse and select the just downloaded file.
- Afterwards it needs to be chosen whether the portfolio should be transferred as an account transfer (from one account to another one, Clearing Member is the same for both accounts) or as a trade transfer (from one Clearing Member (ID) to another Clearing Member (ID)).
(EurexOTC Clear GUI)
- Remember:
- Account Transfer ≙ Transfer from one account to another one, Clearing Member (ID) is the same for both accounts.
> Specify the target book and source system information!
- Account Transfer ≙ Transfer from one account to another one, Clearing Member (ID) is the same for both accounts.
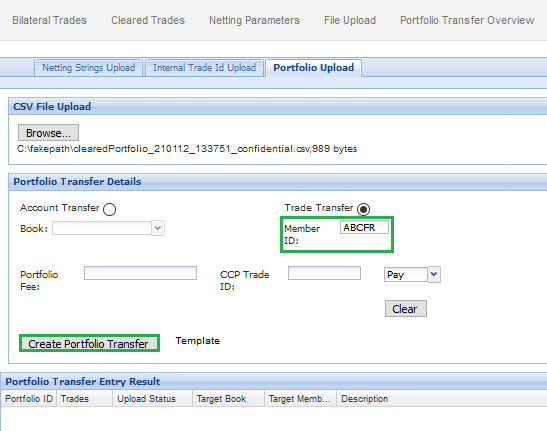
- Trade Transfer ≙ Transfer from one Clearing Member (ID) to another one.
- > Specify the target member (ID) (Clearing Member or Disclosed Client)!
- > Special case: For transfers to Fund Managers, please enter the Clearing Member (ID).
- > Since another Clearing Member (ID) is involved, also two users from the new Clearing Member (ID) with access to the EurexOTC Clear GUI need to accept the transfer!
- Afterwards the result of the portfolio upload can directly be seen below (“Portfolio Transfer Entry Result”).
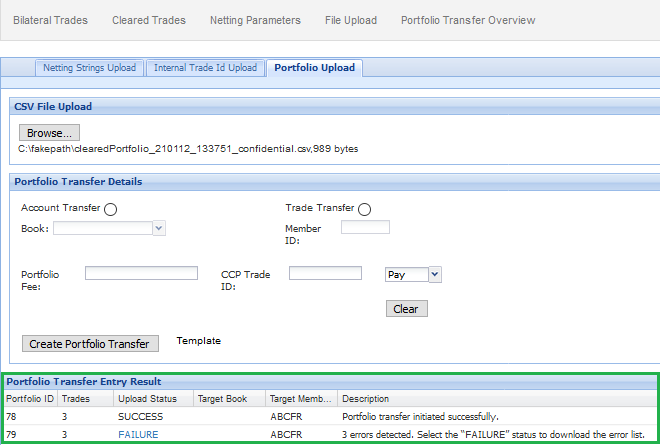
- The portfolio ID helps tracking the portfolio transfer in the next steps.
- If everything is fine with the entered information, the upload status will be “SUCCESS”.
- In case of wrongly entered information, the upload status will be “FAILURE” and by clicking on the respective upload status you can download a csv-file with the error list (here, the portfolio transfer was triggered a second time with the same trades – not possible to transfer them again, hence the error message).
- In the EurexOTC Clear GUI all verified trades (only those can be transferred!) can be found in the “Cleared Trades” tab, setting the trade status to verified.
- If all verified trades from that book should be transferred nothing additional needs to be selected and just click on “Download Options” and then select “Portfolio”.
- The trades of interest can also be displayed by entering the CCP Trade IDs – separated by comma – in the field next to “CCP Trade ID”.
(EurexOTC Clear GUI)

- If you searched for all verified trades of the member but do not want to transfer all of them, the desired trades can be selected (by ticking the box next to the CCP Trade ID) and downloaded as a portfolio (it will be downloaded as a csv file).
(EurexOTC Clear GUI)

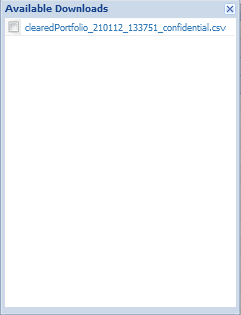
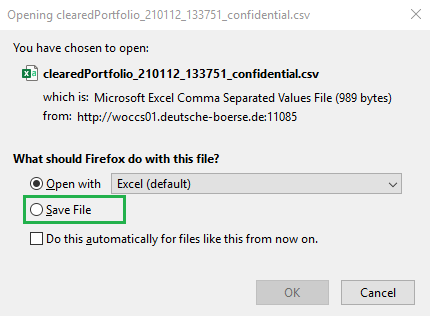
- Click on the respective file and afterwards on “Save File” (the file will be saved locally and will be needed in the next step!).
(Portfolio Transfer Batch Process)

Yes, it is possible to cancel the Portfolio Transfer before the transfer is completed, i.e. before the trades in the source account are terminated and in the destination book are novated. For detailed information, please refer to the OTC Clear GUI User Guide in Chapter Portfolio Transfer Cancellation.
- The cut-off times are equivalent for both production and simulation environment.
- The cut-off time for portfolio transfer requests (that already completed 4EP) to be considered for today’s incremental risk check is 15:57 CET.
- To be considered for the incremental risk check at 1pm CET, a portfolio transfer request needs to have the 4EP completed by 12:58 CET.
- To be considered for the incremental risk check at 4pm CET, a portfolio transfer request needs to have the 4EP completed by 15:57 CET.
- At 8pm CET, only portfolio transfer requests will be considered for the risk check that failed the prior incremental risk check(s).
- If the 4EP for a portfolio transfer request is not performed before 12:58 CET but before 15:57 CET, the portfolio transfer request will be considered for the incremental risk check at 4pm.
- If the 4EP for a portfolio transfer request is not performed before 15:57 CET, the portfolio transfer request will not be considered for any incremental risk check on that day and cancelled at 4 pm CET/CEST.
From one account to another one under the same Clearing Member ID or between two different Clearing Member IDs. This also includes client trades.
- There is no limit for the number of trades to be transferred as a portfolio.
- Please consider, that only trades from the same account can be transferred together.
- Yes, directly when uploading the files for the transfer.
- The fee needs to be assigned to one of the trades in the portfolio (does not matter which trade!).
- The direction of the fee (pay / receive) can be selected.
- The relevant status are:
- VERIFIED
- WAIT_MARGIN
- WAIT_TAKE-UP
- More information on the status and their meaning can be found in chapter 11.2 “Portfolio and portfolio event status changes” of the EurexOTC Clear GUI User Guide.
The trade daily summary report (CI201 / CB201) shows all terminations and novations due to post trade events like account / trade transfer.
- After the 4EP but before the portfolio transfer batch started.
- After an incremental risk check was performed but the transfer failed due to insufficient collateral (before 10pm CET).
Further information is available in the EurexOTC Clear GUI User Guide.
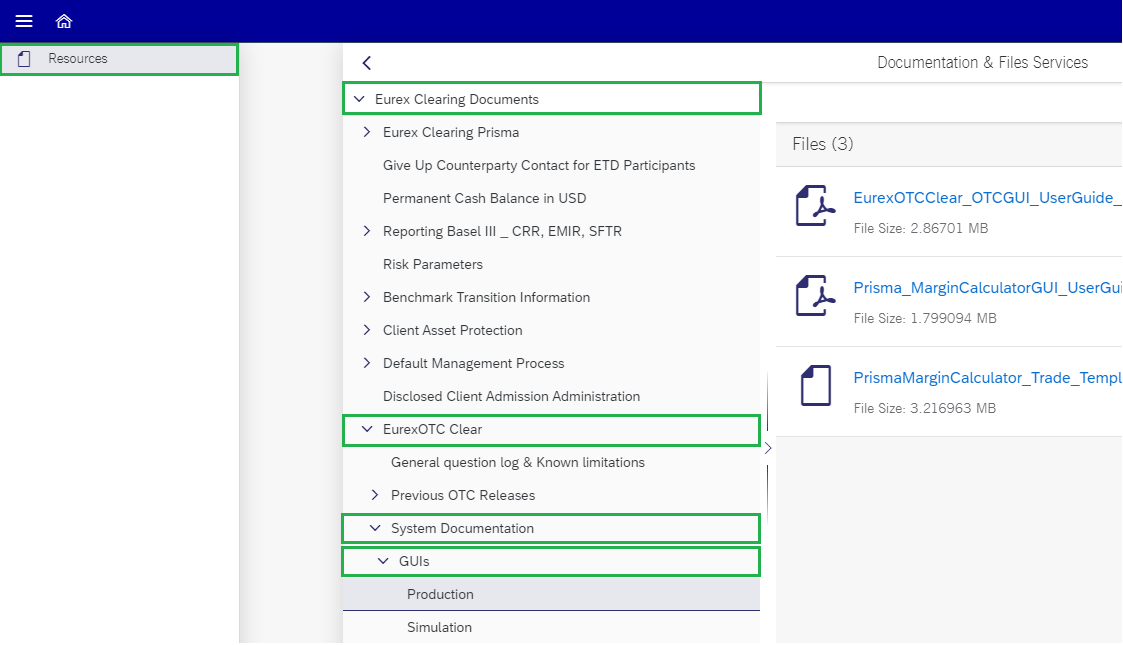
You can find it on the Member Section or via Help in the OTC Clear GUI.
- Member Section:
- Login to the member section portal of Eurex Clearing.
- Go to Resources > Eurex Clearing > Documentation & Files > Technology > EurexOTC Clear > System Documentation > GUIs
(EUREX Clearing Website – Member Section)
- Help Functionality in the OTC Clear Gui:
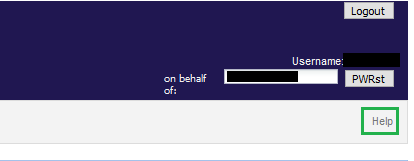
- This will directly provide the manual to be opened or saved.
Contacts
EurexOTC Helpdesk
Eurex Clearing AG | worldwide
Helpdesk Clearing Data Control
Service times Monday to Friday from 08:00 – 20:00 CET
(no service on Saturday and Sunday)
T +49-69-211-1 24 53
Eurex Frankfurt AG
Customer Technical Support / Technical Helpdesk
Service times Monday to Friday from 01:00 – 23:00 CET
(no service on Saturday and Sunday)
T +49-69-211-VIP / +49-69-211-1 08 88 (all)
Eurex Frankfurt AG
Key Account Management
Service times from 09:00 - 18:00 CET